Here is Ripstick Boy at his first swim meet! Each year we plan on him joining only to either move or have too much going on! This summer he finally got to join!
He was really excited to be on the team. He placed 1st, 2nd, 2nd and 3rd in his events.
He went home happy and exhausted!
Parents were asked to bring a dessert so I decided to bring cupcakes.....and thanks to Bake and Destroy's cupcake topper idea, I made these:
The kids really got a kick out of them!
Saturday, May 31, 2008
we have us a winner!
Thursday, May 29, 2008
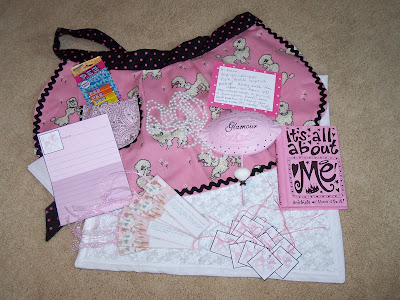
Pink Poodles for Kellie
Here is the Pink Poodle apron I made for the Apronista swap I was in.
I made it for Kellie and she loved it!
I added all sorts of fun 'glam' stuff for her........all in pink of course. Let's see....there are pink poodle gift tags and pink poodle recipe cards and a pink 'apron' hook and a pink journal , some fun pink and pearl Mardi Gras beads and even some bookmarks using her blog header!
The pez candy was a fun thing for her new Batman pez dispenser!
The only thing I couldn't find was a decent pink wig. You are going to have to read her blog to understand THAT little bit of information though!
Free recipe cards
Aren't these the sweetest recipe cards? Guess what? They are FREE!
I found them while reading How About Orange's blog last night. The cards are made by Julianna Smith....an illustrator from Oregon. She also has other really sweet paper products you can purchase from her site so go check her out!
You can get the download for the recipe cards here.
Thanks Julianna!
I found them while reading How About Orange's blog last night. The cards are made by Julianna Smith....an illustrator from Oregon. She also has other really sweet paper products you can purchase from her site so go check her out!
You can get the download for the recipe cards here.
Thanks Julianna!
Wednesday, May 28, 2008
Graduation Day!
School's Out!
Last Wednesday was the last day of school. Both kids received academic awards. Ripstick Boy got his promotion certificate to 7th grade.
He was thrilled.....then we went to the Junior High for next year's IEP and he said "oh my GOSH mom....these kids are HUGE!" He has always been at the top of the scale for size for his age until the last couple years. He is still pretty tall....he is 5'2"....but he is no longer known as the 'big kid.'
Curly Girl was all smiles as they read off her accomplishments for this year. She worked REALLY hard and it paid off. Maybe next school year, she'll be able to play a bit more since the LEAP test is behind her!
Tuesday, May 27, 2008
Drum roll please.....
Thank you all for joining me these last couple of days and for reading my little blog and leaving comments!
The lucky winner of the 100th post give away is Heather from Frankenpug......if you've never been to her site....you need to stop by, she creates AMAZING aprons!
Heather has requested an amigurumi critter so check back and see what I come up with for her!
Monday, May 26, 2008
Mosaic Monday
This summer, Curly Girl wants me to teach her how to do mosaics...amongst other things.
I thought it would be fun to post them each Monday.
Since today is Memorial day, we probably won't get to start our lessons.
I thought I'd post this whimsical birdbath I made for a friend. I love the spiral of marbles in the middle.
It also fits in with the Inspire Me Thursday prompt for this week...."Whimsy."
Friday, May 23, 2008
Gardener's Apron
I made this little gardener's apron the other day. It was SO SIMPLE. A friend called it the 'perfect cheat....'
I had found 2 really cute place mats at Dollar Tree a month or so ago. I knew when I saw them I was going to make them into an apron!
The bright green and even brighter flowers....just screamed "BUY ME!"
I didn't take pictures of my process but I'll tell you how I did it.
First, I cut off all the trim from both place mats.
Then, I folded one place mat backwards onto itself. I wanted to line the design up so it would match. Plus, folding it gives the pockets a bit of sturdiness needed to hold garden essentials.
Then I placed the folded place mat on top of the other place mat, careful to line it up.
Then I sewed the edges together.
I made a total of 5 pockets......2 skinny ones to hold a sharpie and some plant markers. Then 3 other regular sized pockets.
Once all that was done, I used double fold trim to edge it and make the ties.
Since it was a gift, I didn't put any of my dirty garden tools in the pockets but you get the idea!
For a quick project, I think it turned out perfect! Now I need to make ME one!
Wednesday, May 21, 2008
Ice Cream apron
April is in her first 'official' picture!
I made this apron for an apron swap recently hosted by Abby.
My secret partner has small children and likes summery things. I thought the ice cream fabric would be a hit with her kids.
I like that the top pocket apron is separate from the white 'gathering' apron underneath.
I included some fun things she can use and Mardi Gras beads for her kids....which she says were a big hit!
Monday, May 19, 2008
Basil Butter
I cook with herbs a lot and make basil or other herb butters. However, they don't last long refrigerated and freezing in little tubs isn't convenient because it has to defrost.
So, I came up with this method. I've been making basil butter this way for years now.
It is really convenient for all types of cooking on a variety of meats and veggies!
Here is how I make 2 pounds of basil butter:
10 cups of clean, dry basil leaves.
2 pounds of softened unsalted butter
food processor * optional but makes it go faster and has better consistency.
mid sized cookie dough scoop
several sheets of wax paper (about 24 that can fit into a gallon sized zip top bag when folded in half.)
large freezer zip top style bags
rolling pin
scissors
Sometimes I also add chives or garlic, etc. to the basil before mincing. It doesn't take long to mince by hand but when I make large batches, I ALWAYS use the food processor.
Harvest your basil, shake vigorously to get rid of hitch hikers. Then dunk it in cool clean water. Clip or pull the leaves off and then dry them a bit. I put mine through a salad spinner about 3 times and then blot it with paper towels. The basil doesn't have to be bone dry but you don't want a lot of excess moisture.
Once dry, mince your basil and add it to the butter and mix well.
Fold the waxed paper in half over the butter and lightly press down.
Take your rolling pin and very lightly roll the butter to about 1/4 inch thickness. Stay away from the edges or it will squish out! If it doesn't roll out into a perfect shape, it will not matter at all.
It will look like this:
As you can see, not all my butter was incorporated but it won't matter. Using a food processor prevents this. The photo below shows the difference using a food processor makes...see how much more uniform it is? This is some butter I had made before and forgot to upload the photos!
Okay, so repeat with remaining waxed paper and basil butter mixture.
Then continue on scooping until you are done! snip the edges of the paper if you need too and store in a freezer zip top bag.
Freeze up to a year. I've used it past that without issue.
IMPORTANT*
When using this butter, leave it in the freezer until right before use.
It melts quickly so no defrosting is needed.
When frozen, the butter should easily peel away from the paper. See?
If the butter is too thin, it may crumble or stick to the paper so work slowly at first. It doesn't really matter if the butter breaks since it is going to be used right away but it is harder to handle.
The basil doesn't turn black so it still looks pretty. I use this when grilling or baking, broiling, etc. It is good for all cuts of meat and fish. We also use it on bread, just top with a sprinkle of parmesan cheese and garlic powder.
So, I came up with this method. I've been making basil butter this way for years now.
It is really convenient for all types of cooking on a variety of meats and veggies!
Here is how I make 2 pounds of basil butter:
10 cups of clean, dry basil leaves.
2 pounds of softened unsalted butter
food processor * optional but makes it go faster and has better consistency.
mid sized cookie dough scoop
several sheets of wax paper (about 24 that can fit into a gallon sized zip top bag when folded in half.)
large freezer zip top style bags
rolling pin
scissors
Sometimes I also add chives or garlic, etc. to the basil before mincing. It doesn't take long to mince by hand but when I make large batches, I ALWAYS use the food processor.
Harvest your basil, shake vigorously to get rid of hitch hikers. Then dunk it in cool clean water. Clip or pull the leaves off and then dry them a bit. I put mine through a salad spinner about 3 times and then blot it with paper towels. The basil doesn't have to be bone dry but you don't want a lot of excess moisture.
Once dry, mince your basil and add it to the butter and mix well.
If you have a food processor, simply process all the basil and butter together. Takes only a few minutes that way and you get a more consistent butter. I usually put some basil in followed by 1 stick of butter until done. If your processor is small, you may have to work in 2 batches.Take your waxed paper and using the dough scoop, place one scoop of the butter in the center of the waxed paper.
Fold the waxed paper in half over the butter and lightly press down.
Take your rolling pin and very lightly roll the butter to about 1/4 inch thickness. Stay away from the edges or it will squish out! If it doesn't roll out into a perfect shape, it will not matter at all.
It will look like this:
As you can see, not all my butter was incorporated but it won't matter. Using a food processor prevents this. The photo below shows the difference using a food processor makes...see how much more uniform it is? This is some butter I had made before and forgot to upload the photos!
Okay, so repeat with remaining waxed paper and basil butter mixture.
Then continue on scooping until you are done! snip the edges of the paper if you need too and store in a freezer zip top bag.
Freeze up to a year. I've used it past that without issue.
IMPORTANT*
When using this butter, leave it in the freezer until right before use.
It melts quickly so no defrosting is needed.
When frozen, the butter should easily peel away from the paper. See?
If the butter is too thin, it may crumble or stick to the paper so work slowly at first. It doesn't really matter if the butter breaks since it is going to be used right away but it is harder to handle.
The basil doesn't turn black so it still looks pretty. I use this when grilling or baking, broiling, etc. It is good for all cuts of meat and fish. We also use it on bread, just top with a sprinkle of parmesan cheese and garlic powder.
Sunday, May 18, 2008
Leo's precarious perches.......
Leo is my little shadow during the day when the kids are at school. He follows me around and perches nearby. He isn't a 'lap' cat like so many are. He wants to be near....but on his terms.
He especially likes to sit on the top of my computer chair while I'm in the seat using the computer. But the top part that he sits on is really narrow so he usually has his claws stuck in to help him hang on. He also will sit on this little ledge that overlooks the downstairs family room. He'll pace back and forth, sleep and even hang over the edge in a half hearted attempt to jump down. He'll even stretch up on the wall like he is going to use it as a scratching post. I really HATE it when he does that. He fell 2 times already when he was a kitten. Not from this side but from the other side facing the stairs. Both times, some shelved furniture in the entry hall broke his fall......
On THIS side though, he'd have to jump at an angle...and hope to land on a chair.......
Lovely Leo.........I much prefer you here.......
Friday, May 16, 2008
Me so Happy.....
Yesterday the mailman brought me an abundance of goodies!
First up is my little octopus "Blossom" from an amigurumi swap.Isn't she just tooooooo cute?
I got these neat things...LOVE teaspoons for tiny amounts and the potholders....from the Atomic Housewives Swap.
Last but not least I got this apron and some cupcake goodness from the Mother's Work Apron swap........Sock Monkeys RULE!
Thank you to "girthta", and Renae and Crystal
Tuesday, May 13, 2008
What makes me laugh til I cry...
Hey...lets go to the pool....but first, I need my SWEATER....
I love to laugh....I mean, the kind of laughing that makes your stomach hurt and tears roll down your face...the kind that ALMOST makes you wet your pants.
So if YOU like to laugh too......the inappropriate 'point and make fun of' type of laughter....the "I can't believe they WORE that' type laughter then head on over to Stitchy McYarn Pants........and no, I'm not posting this to win anything. But be sure to READ it too....half the fun is the stuff that they've written...
I am just happy to find a site that is as seriously warped as I am.........they just write better.....
I promise you....you'll be hooked.
National Wear Your Apron Day!
Yesterday was National Apron Day and I participated. I was surprised that I didn't see at least ONE other person wearing an apron (that wasn't BEHIND a counter!)
At any rate, I got some weird looks, a few giggles, and more than a couple 'did you know you have your apron on?' questions with raised eyebrows!
I was cracking up. I mean, if I'd been in New Orleans people would be wondering why I had CLOTHES on under my apron!
Here are a few more pictures.....I took several in the morning while working out and running errands and more after getting ready for the day.....!This was at Kenny's seafood market. I wasn't even going to ASK them to take the picture....afterall, they were young guys with fish guts on their hands. But the funny thing is....THEY wanted to know all about it and were saying how much fun it was to do something as a group nationwide.
In the post office...some poor lady took this while balancing her checkbook and baby.......she too thought it was a neat idea.
The only place I got a sigh and an 'okay' was at the library.......too bad for her...that lady didn't know the fun she was missing out on!
Sunday, May 11, 2008
Mother's Big Day (uh, night actually...)
We are such Mother's Day rebels.
Dean and the kids gave me my Mother's Day gifts yesterday. Dean couldn't stand it. He just had to see my reaction when I opened my goodies. Wouldn't even give me time to put on makeup...except for lipstick...thank goodness for THAT.
He promised no photos but whipped out the camera from a hiding place and started snapping away...sorry folks!
I was thrilled to get the lamp for my piano. I've never needed one before but in this house we have a built in nook that the piano fits into which is GREAT accoustically....but gets a bit dark in the evenings.
Imagine my joy 'o' joys when I read the box as I opened this next gift....
Oh yeah.........I KNEW it! What could a rectangular box possibly hold for an apron obsessed seamstress? A dress form! And its just my size........8-)
We always go out to dinner Saturday night for Mother's Day. It is just too crazy on Sunday.
I hate crowds and the thought of being in one just to EAT LUNCH doesn't appeal to me at all.
So we all tromped off to a movie of my choice....IRONMAN....and it ROCKS!!!
Afterwards, we went out to dinner....my choice again!
OH! And since it was 'my night' they let me dash in to Hobby Lobby for a minute to pick up a coordinating fabric for an apron I am making.........now THAT is power..........
Ah, Mother's Day........I'll miss you until next year!
Friday, May 9, 2008
Happy Mother's Day weekend.....
To all of you "Moms" who stop by for a visit, Happy Mother's Day weekend!
And that goes for you moms of fish, cats, dogs, horses, turtles and any other critters too!
To mom,
you taught me to eat tomatoes on crackers....
you said..."just because some boy takes you to dinner, doesn't mean you have to be dessert"
you gave me all your heirloom cake recipes and told me the secrets to making them....
you gave me a wicked sense of humor and it serves me well....
you gave me the gift of books and I still get lost in them....
your laughter is magic
Happy Mother's Day.
the little things......
Thursday, May 8, 2008
I'm a mommy hack............
Mornings around here are pretty routine.
My little ducks get up and get dressed, make their beds, brush their teeth, then come down for a nice hot breakfast of yummy oatmeal or bacon and eggs.
I, of course have been up since 5 am to ensure they are happy and well fed....(insert Cinderella music here....)
SCRATCH THAT...........Martha doesn't live here.
Okay, so I don't get up and make a hot breakfast each and every day of the week. Heck, I ate poptarts and cereal as a kid so they are good enough for my own offspring.
Dean is up and out before the kids eat breakfast...usually. But on this particular day, I was buzzing around upstairs and wasn't IN THE KITCHEN to make breakfast.
Dean was home because he was going on an appointment before heading to the office.
This is what is said:
Curly girl: "Mommy, what's for breakfast"
Me: 'poptart, cereal, toaster strudel'...this implies that I am not cooking so they need to scrounge. Then me again: "I'll be right down" implying that I will help them figure it out.
Curly girl: "oh"
A minute later......this is what I hear:
Curly Girl: "dad, can I have cake for breakfast?"
Dean: " no"
Curly girl: "But MOMMY LETS ME."
Dean: " Well, I'm not going to, cake isn't for breakfast"
Curly girl: "why not?"
Risptick Boy: "Yeah, MOM lets us, we like eating cake for breakfast"
Dean: "no, you can't have cake for breakfast"
Me: "WAIT A MINUTE"
Hear me running down the stairs now to come to my defense....forget the kids still haven't eaten breakfast...........(they did....I gave them cake after Dean left for work 2 minutes later. shhhhh....don't tell him.)
What transpired between Dean and I wasn't blog worthy. Lets just say, I do eat cake for breakfast and he doesn't. But he isn't a Russell. In our household, we ALL ate cake for breakfast. Its tradition. And I have the recipes to prove it and yes, I use them. All homemade. No box cake ever waltzed through the door of my mom's kitchen. A box cake makes it way through my door fairly often....Dean LOVES yellow cake. I love chocolate chip cookies. I get homemade cookies, he gets box cake. But, I'm getting off topic.
Let's think about breakfast......hmmmm, lets have a yummy piece of mom's homemade chocolate cake with divinity icing or......a 'tasty and nutritious' piece of cardboard known as a poptart.
I mean, COME ON PEOPLE.
Poptart? Toaster Strudel , frozen waffle....(.scratch waffle.... in our house we make chocolate chip waffles.....), then we have the all important CEREAL that has been 'fortified with vitamins and iron'...oh and bits and pieces of dried up spiders and bugs that fell into the vat while being processed...........I guess they call that PROTEIN.
Okay....so here is my defense at being a mommy hack at breakfast. I cook a TON. I mean it. I love to cook and bake and we enjoy good meals in this house. I cook every day unless it is something I planned to have leftovers from.
Fast food? Rarely...even when I worked, I've always cooked.
But BREAKFAST? Hot breakfast is for weekends or for those mornings you need something substantial before a big exam. Or for those mornings I had insomnia and was up early anyway....
So, that being said, I am a mommy hack. I give my kids cake for breakfast.
BTW, the offending cake? It was CHEESECAKE....for crying out loud, that hardly counts as 'cake.' I don't even eat it....so I KNOW it doesn't count as cake.
So here is my recipe for cheaters cheesecake:
buy a graham cracker crust
beat 2 blocks of cream cheese til light and fluffy
add 1 can of sweetened condensed milk
beat again
add 1 tsp vanilla, beat
add juice of half a small lemon, beat
pour into crust, chill until ready to serve.
Wednesday, May 7, 2008
A little jelly please....
I am in a swap right now and came up with this little surprise for my partner........hope she isn't peeking!
I've included the pattern for anyone interested. I tested it twice but, alas, I am not perfect so please forgive me if you find an error.
The good thing about these little jellyfish is that don't sting you!
To make one:
you will need one type of varigated yarn and one solid color yarn that coordinate...small amounts, no full skeins needed here!
G size crochet hook.
blunt tapestry needle for hiding ends and sewing on tentacles
polyfil or something to stuff the little critters with
large seed bead or small safety eyes
row marker
For main body:
Using main color sc 6 into a magic ring. set row marker, begin moving up with each subsequent row made.
Row 1: sc 2 into each sc around = 12 sc
Row 2: 1 sc into next sc, then 2 sc in next sc, around = 18 sc
Row 3: 1 sc in next 2 sc, then 2 sc in next sc, around = 24 sc
Row 4: 1 sc in next 3 sc, then 2 sc in next sc, around = 30 sc
Row 5: 1 sc in next 4 sc, then 2 sc in next sc, around = 36 sc
Rows 6-8 : 36 sc around
Begin decreases....this is sort of doing the above in reverse.....
When working a decrease, you work 2 sc together as 1 unit.
Row 9: 1 sc in next 3 sc, then work 1 dec, around (30 sc )
Row 10: 1 sc in next 2 sc, then work 1 dec, around
Row 11: sc around
At this point, add eyes and stuff firm but not over full.
Rows 12-15: work 1 sc in next sc, then work 1 dec , around until hole gets small enough to slipstitch closed. Fasten off and sew in tail.
Ruffle:
I don't have ANY idea what that part of the jelly is called.....it looks like a ruffle....
I made mine 2 rows but you could make yours bigger.
Attach body color yarn with a slip stitch low on the body, pull through and chain 3. If you don't work over the tail, plan to sew it in later.
Insert hook in little gap between stitches under belly and slipstitch, chain 3 again, insert hook in next little gap....do this around the body.
When you come back to the beginning, slipstitch to the middle or 2nd chain in the little row. Do another row of these. (they are actually called picot.) When you reach the end a second time, fasten off and sew in tails.
Tentacles:
You'll make a total of 6 tentacles. The varigated tentacles will naturally spiral as you work it.
On all the tentacles, you'll need to either 'work over' your beginning tail or sew them in later.
Be sure to leave a long tail at the end of each tentacle to sew to the body.
Make 2 : using varigated yarn, chain 80. Turn, sc in 2 ch from hook and across to end. Fasten off, leaving tail to sew to body.
Make 2: using varigated yarn, chain 55. Turn, sc in 2nd ch from hook and across to end. Fasten off, leaving tail to sew to body.
Make 2: using body color, chain 50. Fasten off, leaving tail to sew to body.
To assemble:
Attach all tentacles where the belly would be inside the little ruffle.
Attach the 2 body color chains toward the front of the body
Attach the longest varigated tentacles toward the back of the body.
Attach the short varigated tentacles in between the other two.
Attach a little loop of thread at the top to hang your new pal.
Monday, May 5, 2008
Hootie and the OctoSibs.....
This past weekend I was super crafter!
Starting Friday evening, I knocked out a bunch of my hootie bookthongs. If you like them the pattern is in the 'free pattern' section of my blog.
Saturday it rained all day...the perfect excuse for staying in pjs all day long...watching old Indiana Jones movies and crocheting and sewing and cooking and baking Rocky Road cupcakes from a recipe in this cookbook.
YUM
I knocked out 3 aprons but can only post this ruffled one I made for the Apronista challenge.
The other 2 are surprises so I can't show them here.....yet!
I did the OctoSibs for a swap a couple weeks ago and forgot to post them...cute, huh?
I used this pattern for the little blue one and this pattern for the red one. The pattern for the little strawberry is in my free pattern section too.
Sassy apron done, Flirty apron? BEGUN!
Here is a picture of my Summer Sassy apron for Lucy's swap. Of course I couldn't show you the apron yet! Lucy said we couldn't......we gotta follow da rules!!!!!!!!!
My partner will just have to wonder whats inside this little bag tied with.........
Now I am off to join Shawnee's Flirty Apron Swap II for Independance Day! There is a wonderful apron give-away going on too.
To check it ALL out, go here.
Sunday, May 4, 2008
Naked Mo' Rat
Let the laughter ensue.......
Here is a picture of Mojo after coming back from getting shaved at the groomer. He looks like a naked mole rat.....or like he is wearing PJs.
We've never had to shave him before because we didn't live where it was so humid. He was soooooooooo miserable though. He couldn't chase the ball for more than 5 or 6 throws because his coat is sooooo thick.
Corgis are triple coated for WALES weather....not Louisiana weather............
Anyway, we decided "why not give EVERYONE a good laugh at his expense!"
He looks sooooo dejected and embarrassed. Like............"PLEASE don't take that picture."
But this is how he normally looks...all fluffy and handsome.
Don't worry Mojo, your beautiful coat WILL grow back!
Saturday, May 3, 2008
Mushroom bookmark
I was in a mushroom bookmark swap recently and came up with this to send. I didn't want to do traditional amigurumi because I wanted the bookmark to be flat. Turned out pretty cute.
Here is the pattern if you'd like to make one yourself:
You'll need:
bits of yarn in cap and stem colors
blunt needle to sew yarn
sewing needle for beads
pearl or seed beeds for cap
size G crochet hook
CAP:
With cap color, sc 6 into a magic ring.
Row 1: 2 sc in each sc around = 12 sc
Row 2: 1 sc in next sc, then 2 sc in next sc, around = 18 sc
Row 3: 1 sc in next 2 sc, then 2 sc in next sc, around = 24 sc
Row 4: 1 sc in next 3 sc, then 2 sc in next sc, around = 30 sc
leaving a LONG tail to sew to stem, fasten off.
Sew on pearl or seed beads now while cap is a circle.
STEM:
With stem color, chain 5, sc in 2nd chain from hook and across= 4 sc. Ch 1, turn.
Rows 1-12: work 4 sc in each row, ch 1 and turn between each row.
The stem will be a little over 2 inches in length before folding it in half.
Fasten off, leaving a sewing tail.
To assemble:
Fold stem in half and sew all around open edges to close it.
Lay top of stem onto edge of circle, letting them overlap a bit. You want to catch the stem while sewing it into the cap of the mushroom.
Fold circle in half and push stem into it a bit. You can sew the cap to the stem either at an angle or straight on.
Finish, bury ends.
For thong:
Push hook through base of stem, catch yarn from other side, pull through and beginning chain stitch, be sure to catch tail up and crochet over to secure it.
Chain 30-45 depending on size of book.
At the end, add either a bead or a tassel.
Friday, May 2, 2008
Let them eat CUPcake....
I can finally post the cupcake themed apron I made for my partner in the "Crazy for Cupcakes" Apron Swap.
I had soooooo much fun with this one. After all, who doesn't like cupcakes?
I included some recipe cards, the Cupcake Deck, some postcards and general cupcake baking items along with some goodies from her profile. What a fun swap!
Subscribe to:
Posts (Atom)