If you'd like to play along, just link in at the bottom of this post...I hope you do!
So on to the project!
The last couple of years I've bought a bag of cheap plastic skulls from the local dollar store. You get 10 skulls for a buck. I've used them in lots of little projects.
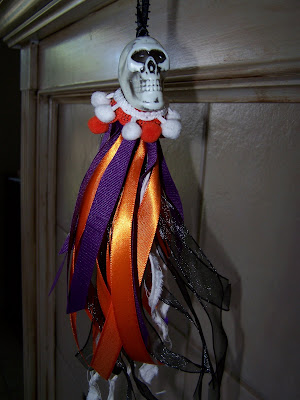
This time, I decided to turn one into a Halloween tassel.
You will need:
a plastic skull
dowel rod or pencil
drill
E6000
ribbon/muslin/fabric: 4 kinds cut at differing lengths. Cut 4 of each type/color
2 types of trim
scissors
pony beads
spiders, etc.
tapestry needle
First take your skull and drill a hole into the bottom and then another hole into the top. I drilled the top hole where the seam line was and it hangs perfectly.
Be careful, plastic is slippery. I held mine against a cushion and went very, very slowly until I got it going.

After you drill your hole, take a blunt pair of kiddie scissors and widen just the bottom hole to a little smaller than the size of your dowel. You want a REALLY tight fit on this.
Set the dowel aside and thread a piece of ribbon on a tapestry needle and go thru both holes.
Tie a knot and stuff it up into the skull, remember to take the needle off before tying your knot!

Now shove the dowel into the skull and mark it where it sticks out about 2 inches. BTW, soft wood can be cut with kitchen shears or nippers.
Cut the dowel and put some E6000 on one end and shove it back up into the skull until it stops. Let it dry.

Now the fun part!
Take your longest ribbon or muslin and simply tie a knot on the dowel. Do this with all 4 pieces.
Flatten them down a bit

Repeat with the next longest and flatten again

Move the knots with each change of color
 After adding your last color, go around and tweak the ribbons and shift the knots to where they are all uniform. Make sure your knots are tight or dab some glue on and let it dry.
Now add your edging. I used 2 types of bobble trim for mine because I had it in my stash and was too lazy to go buy something better.
Cut it a bit longer than you think you'll need....it has to go around all those knots!
Use your E6000 and glue it around under the jaw but low to cover all the knots.
Top off with another trim, covering up the first trim edge. Put it tight against the jawline to cover up everything. It will give it a more polished look.

Now, take some Halloween colored beads. I used pony beads because I had some on hand. Slip them up onto the ribbons. After that, glue a spider on a ribbon or two...
It looks like this now...
 Hang it up to completely dry.
your next so link in!


4 comments:
Love the tassels Val. What a cute and great idea.
Hope you are having a good weekend.
Lindsay
x
very spooky cute. I am going to make this. thanks for the tut.
neat ideas..
Great tassel Val - thanks for sharing:-)
Post a Comment