skip to main |
skip to sidebar
Welcome to week 2 of Spookify Me Saturday!If you'd like to play along, just link in at the bottom of this post...I hope you do!So on to the project!The last couple of years I've bought a bag of cheap plastic skulls from the local dollar store. You get 10 skulls for a buck. I've used them in lots of little projects.
This time, I decided to turn one into a Halloween tassel.You will need:a plastic skulldowel rod or pencildrillE6000ribbon/muslin/fabric: 4 kinds cut at differing lengths. Cut 4 of each type/color2 types of trimscissorspony beadsspiders, etc.tapestry needleFirst take your skull and drill a hole into the bottom and then another hole into the top. I drilled the top hole where the seam line was and it hangs perfectly.Be careful, plastic is slippery. I held mine against a cushion and went very, very slowly until I got it going. After you drill your hole, take a blunt pair of kiddie scissors and widen just the bottom hole to a little smaller than the size of your dowel. You want a REALLY tight fit on this.Set the dowel aside and thread a piece of ribbon on a tapestry needle and go thru both holes.Tie a knot and stuff it up into the skull, remember to take the needle off before tying your knot!
 Now shove the dowel into the skull and mark it where it sticks out about 2 inches. BTW, soft wood can be cut with kitchen shears or nippers. Cut the dowel and put some E6000 on one end and shove it back up into the skull until it stops. Let it dry.
  Now the fun part!Take your longest ribbon or muslin and simply tie a knot on the dowel. Do this with all 4 pieces.Flatten them down a bit
 Repeat with the next longest and flatten again
 Move the knots with each change of color
 After adding your last color, go around and tweak the ribbons and shift the knots to where they are all uniform. Make sure your knots are tight or dab some glue on and let it dry.
 Now add your edging. I used 2 types of bobble trim for mine because I had it in my stash and was too lazy to go buy something better.Cut it a bit longer than you think you'll need....it has to go around all those knots!Use your E6000 and glue it around under the jaw but low to cover all the knots.Top off with another trim, covering up the first trim edge. Put it tight against the jawline to cover up everything. It will give it a more polished look.
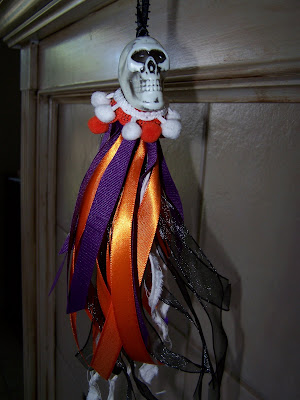 Now, take some Halloween colored beads. I used pony beads because I had some on hand. Slip them up onto the ribbons. After that, glue a spider on a ribbon or two...It looks like this now...
 Hang it up to completely dry.
 your next so link in!
Dehagification:
"The process in which a witch dehagifies herself in order to snare some poor unsuspecting victim..."for example:
Before Dehagification:

After Dehagification:
There are several maladies that affect witches and other magical folk. These maladies are not curable with spells, they need good old fashioned medicine and time.
Each Monday during October, I will share a sampling of some of these diseases and conditions.
Week 1:
"Tolio"
A condition that affects the tissue of the toes. Some shrink, while others twist and get knots in them....this creates a gnarled, unbalanced appearance.
Untreated Tolio can lead to Toliosis.
"Toliosis"
A horrific condition of the toes contracted due to the neglect of Tolio. Once contracted, toliosis can cause toes to fall off.
When this happens, witches use replacement parts, which is why many witch toes look like human thumbs.
"The Gumps"
Trolls are frequently affected by this disease. When affected their IQ plummets dangerously low. During this time, many are referred to as Forrest, most likely due to the fact that they live in the woods...however, that has been disputed.
"Sneasles"
Mostly affects tweenagers. When one contracts sneasles, with each sneeze, a new blemish in a variety of colors appears on their faces, shoulders and upper back.
There are a variety of drugs on the market for Sneasles, ProRativ being one of the most effective.
Hackups:
Hackups tend to affect cat oriented witches.
While in prolonged feline form, witches cannot help but tend to their fur.
Once they return to their normal state, they invariably have a hackup fit and cough up fur balls like a regular cat would.
Unfortunately, hackups tend to last several minutes and with each spasm, another fur ball is hacked up. This is one of the leading causes of spinsterhood for witches.
Each year I do a few projects for Halloween....just like some many others. I thought it would be fun to link up so people could see what each other did.
At the bottom of the post, I've set up a Mr. Linky so you can link up if you want to.
That way, people can go from one to another to steal some ideas for there own Halloween projects!
Here is my first project for Spookify Me Saturday...a mummy hand!
You'll need a few supplies:
a latex glove
stiffening product (cornstarch will do...so will glue. I just happened to have something on hand.)
double sided tape if you have it
newspaper...or plastic bags....the bags work great
muslin ripped into long pieces. Most of mine were about 1/2 or 1 inch wide and a foot long
 Take the glove and stuff it with newspaper or plastic bags, making sure you get the fingers stuffed up pretty good! Twisting the paper makes great finger shapes:
 Then stuff the rest, making the palm rounded a bit.
 After stuffing the palm, tape the wrist closed. I think staples would pull out but you can try it is you don't have any tape, just don't stuff it as far down the wrist.
 Rip a piece of muslin to cover the wrist area...it will be wider than the rest of your ripped muslin. I used double sided tape to hold it in place:
 Then start wrapping, winding around fingers and the palm, you'll make lots of "X" shapes as you go along so you can hide the tails of each new piece of muslin:
 At odd areas it was easier to tuck in the end....do whatever works best for you:
depending on where it ends, you can either tie a knot in the middle of the palm ortuck in the end. I tied a knot because I liked the look. Now, take some fabric stiffener and paint the hand with it. Coat it really well and cover up any tails, knots, etc. Let it dry overnight!Then you can grunge it up. I rubbed mine with coffee granules. I was going to gore it up but Kaela put the kibosh on that! Here it is! I'm sending this one off in a package but am going to make myself one too!
Feel free to link up!
 I am so excited that October is here!
This is my favorite time of year because the weather cools down and the fall colors are so beautiful! I can't wait to open the windows again and let a cool breeze go through the house.
I'm doing fun Halloween posts all month long so please stop by.
On each Saturday I'll be posting a fun project so come back and post one yourself using Mr. Linky!
I'll host a giveaway or 2 along the way, just to get into the spirit!
This year I have tried to be a bit more creative which is why I hosted YOE.
We are in the last quarter now and looking back, I am so glad I did it. Not only have I had fun and met new people, but I've tried new crafts and had fun in the process.
I always make at least 2 ornaments and choose the best one to send off to my partner.
This month's ornament was the mouse.
First, I made this one...it is about 3 inches tall. I used a pattern that I bought last year and added a little crocheted scarf .
 and this one..I was inspired by an ornament off Calamity Kim's blog. I was going to link to it but can't find it!...anyway, here is what I did...
 I sent the first one off because it was more difficult to make and looked so sweet holding the little Christmas tree....but I love them both!




 After adding your last color, go around and tweak the ribbons and shift the knots to where they are all uniform. Make sure your knots are tight or dab some glue on and let it dry.

 Hang it up to completely dry.


